Showing posts with label Christmas. Show all posts

Sunday, April 12, 2015

Quilting the Daisy Chain


Hi Friends!

Confession time: I have two, maybe weird but I think totally normal, habits.

The first is, if I really want to sew but there is something that is more important to get done (for example, taxes) I won't sew anything until I get the more important task done.

Second, if I do have a big task in front of me (like, say, quilting) I have a hard time doing it until I have wrapped my head around how I am going to get it done.

Both of those little quirks dominated this past week.

We were on Spring Break and I was pretty determined to get at least two things done (while our roof was being replaced): finish our taxes and quilt my Daisy Chain quilt.

The taxes got done without many problems (thank you, 2009 self, for keeping the closing documents from the house we bought-life was so much easier because of that!), and I wasn't going to start quilting until it got done. The only problem was I couldn't figure out the particulars about actually quilting my Daisy Chain.

For those of you who are non-quilters, all the work I have done up to this point has just been piecing all the fabric together into a pattern-this particular pattern is called Daisy Chain; the quilting part doesn't start until the quilt top is completed and it is layered with a bottom piece of fabric and batting in between the two. The quilting is the design that you sew to attach all three layers together and form a nice little quilt.

You can see all three layers here: the bottom layer of fabric (wrong side up), the batting, and the quilt top. 


Getting to the actual quilting part requires pinning all three layers together and, frankly, it's my least favorite step. I suppose if I was doing a small quilt it wouldn't be a big deal, but I have to lay everything down on my floor of my living room and get down on my hands and knees to pin the whole thing.

To be honest, I was putting off the pinning part; instead, I worked on my son's Christmas stocking for a few days. It was actually kind of nice to take a break from the sewing machine and focus on my first love, counted cross stitch.
Where I am at now.
Where I was the last time I wrote about the stocking.


But soon, I got back to the quilt. I decided to do a cross hatch design which is a pretty fancy way of saying I'm going to put diagonal lines all over it. It's taken me about three days to do the first half of all the diagonals which I think is pretty good time. I'm going to bury all my threads and then start on the second half of the quilting.


I decided to not quilt the crosses in the Daisy Chain, but I am thinking of doing a stitch-in-the-ditch (or "outlining" them) to make them pop. I'll see how it looks when I am done. 


Any questions you have about making a quilt?

Happy Sewing!

Kate

Tuesday, December 30, 2014

Noel Pillow

Hi Friends!

One last item got crossed off the list before the New Year! Hooray!

I actually started working on it about five days before Christmas. As you might have surmised-from this post, this one, or this one (and I could find at least five more!)-once I get an idea in my head it is hard for me to move forward until that idea comes to fruition. That meant, I had to make this before I could start wrapping presents, shopping or cooking for Christmas dinner.

I finished this little piece of cross stitch two years ago but hadn't done anything with it.
It's the Noel cross stitch in the back
And I had this piece of fabric my mom's friend, Diane, had sent to me a while ago that just needed to be loved.
Don't they look nice together?
I was having a discussion with my mom over FaceTime about what to do with both of them. At first I was thinking a wall hanging but, almost simultaneously, we said "pillow." The best part was I had just bought a brand new pillow form at Goodwill for $2 and it was burning a hole in my pocket (so to speak). 

I used this YouTube tutorial and it was easy as pie. Except sometimes I can be a Grade A Idiot and I somehow messed it up (I think I didn't measure my pillow form correctly; I may have eyeballed it.) 

 I found a smaller pillow form and it was still too big so I modified it slightly by taking an inch off the whole darn thing. And it looked like this:
Not too shabby

But the back looked like this:
Not acceptable
So I added another panel to one of the envelope flaps to lengthen it and the back looked good:
Yay, I fixed it!
But....I attached the whole thing backwards and the front looked like this:
Back to unacceptable
If you can't tell, that's the back of the cross stitch. 

At this point I really was starting to question my sewing abilities.

I put it down for a night, took it apart once more and (finally) got it right. 

Close-up of the cross stitch

Here it is, in all its glory:
Finally!

I think it turned out pretty well!

I hope you are finishing some last minute crafts at home. Don't forget to submit a picture to me by December 30 and I will enter you to win a $25 gift certificate to JoAnn's.

I have some ideas for the New Year and can't wait to share them with you.

Keep on Crafting!

Kate


Friday, December 26, 2014

Last Ornament Post, I swear

Before Christmas, I was working hard. After I finished the ornaments from the last post, I took another look around my sewing area and realized I had these ornaments as well to finish.


I just love the simplicity of these ornaments. I do remember them being super fast to whip up! 

Here's how I finished them to hanging quality: 

1. All three of the ornaments (there are two girl ornaments for both my daughters) were on one piece of Aida, so I cut them out giving them a 1" border all around. They ended up being 5.25" x 6" finished. 

2. I then cut out the same size of batting and backing fabric. I decided to use batting as a stabilizer as well as to fill it out a little more and make it hang better. 

3. I cut out 3 4" pieces of navy grosgrain ribbon. I formed a loop with the ribbon and layered it along with the backing, batting and Aida and pinned everything together. I added a pin to the ribbon to keep it in place. 

4. I stitched a second border 1/4" from the design.

5. Using pinking shears, I cut right along the 1/2" border being very careful when I got the ribbon so as to not cut it. 

You are done!


They look this cute:


What are you working on? Something for CraftBusters? Remember, the deadline is December 30th!

Happy Crafting!

Kate

PS
Don't forget, you can follow me on Facebook , Instagram , and Twitter!


Wednesday, December 17, 2014

Clay Ornament Recipe and Mommyhood Failings

Let's be honest, it's sometimes fun to read about the failings of others. Not horrific failings but, you know, that the bloggers we follow don't live in a world of perfectly iced cookies, seams that aren't always perfectly mitered, and children who don't happily occupy themselves for hours on end so they can finish whatever project they are working on.

Frankly, I don't know how other bloggers do it. Do they have help with the housework? With the cooking? Do they just order take out every night? Do they trip over trains in their living rooms their entire houses? 'Cause that happens over here (sadly not the help with the housework or the cooking). That's how things get done.

Unfortunately, even under the most perfect circumstances, things can go horribly awry over here. I'd like to tell you about it.

On top of all the stuff that has to get done at Christmas time, I received the notice my kindergartner needs to bring 18 gifts for each of the kids in her class. Of course, being me, we have to hand make them. I can't go out and buy 18 tiny tubs of Play Dough, or 18 pencils with cute Christmas-themed erasers. That would be way too easy. No, like a dummy, we have to make something. From scratch. Big mistake.

I decided that we should make ornaments. It's no harder than making cookies, right? I thought about the cinnamon ornaments you see everywhere but the dough is so finicky and my arms break out in a rash from mixing all that cinnamon and applesauce together. Plus, they take forever to dry out and harden. I didn't want to make salt dough ornaments but I did find this recipe for clay-like ornaments (see below).

So pretty! So easy!


They were really easy to put together and I added silver glitter right to the dough to give them a little pop.  I used both regular sized cookie cutters and these little mini cookie cutters in the shapes of snowflakes and gingerbread women/men. I diligently poked a hole at the top of each ornament before baking them but what I didn't do was make the hole big enough in the mini ornaments to thread anything through-not ribbon, not dental or sewing floss, nothing. Even though we had made them a week before they were due, I didn't notice the hole situation until 9PM the night before she was supposed to bring them to class and we didn't have enough of the big ornaments for everyone.

So cute! So useless!


Cue the mild cursing to myself.

I came up with a (lame) alternative and was done in less than hour but still.....

So Boring. 


Learn from my mistakes People! Poke big enough holes in your ornaments!

Recipe for Ornament Clay

1/2 c cornstarch
1 c baking soda
3/4 c water

Mix all the ingredients in a medium saucepan over medium heat. As the mixture warms it will get thicker and thicker. When it looks kind of like mashed potatoes, take it off the heat, cover with a damp cloth and let it cool. It doesn't take that long to cool but I couldn't get to mine until about four hours later and it was still perfectly workable.

Once cool, knead it together using extra cornstarch if it is too sticky.

I used two 1/4" square dowels as a guide to make the dough an even 1/4" consistency while rolling it out and then used cookie cutters to cut out the shapes.

Lay out all your creations on a parchment lined cookie sheet. Using a straw, poke a hole at the top of each ornament. From experience, a toothpick is not big enough. Bake at 175 degrees (F) for 30 minutes, than rotate the cookie sheets and bake for another 30 minutes. Let cool.

Once cool, you can paint them to your heart's desire or just leave them white.

A few add-ins:
When kneading the dough, I added in silver glitter and kept on kneading the dough to distribute it evenly. I probably used about 1 cup of glitter but I just kept on adding more until I thought there was enough. In hindsight, I would either add more, or use a finer glitter; the stuff I used was pretty big.

You can also try adding food coloring to the water before you mix everything together.

(Slightly adapted from Tips from a Typical Mom Blog )

Whatever you do, have fun! And poke big enough holes!

Kate

Monday, December 15, 2014

Christmas Ornament Tutorial for Framing

Hi Friends!

I am super excited to post today because I have crossed off #9 on The List! I even have a pretty easy tutorial on how to finish them.

But first,  a little story. On Saturday afternoon we were driving to my son's Christmas Concert (3 year olds singing Christmas songs would melt even the iciest of hearts, tbh) and I mentioned to my husband that I wasn't feeling very fulfilled creatively. I read a number of blogs and follow a number of crafters on Instagram and seems like they are just finishing projects left and right and I'm not getting anything done. As I was unpacking all of my sewing and crafting supplies, I realized I have WAY WAY WAY too many projects that haven't been started (hence, this blog and a topic for another day) and that overwhelming feeling has been following me around for the past couple of weeks. So last night when we got home and the kids passed out in their beds I realized I had to make the decision to actively work to get my projects done.

I thought about what I could accomplish in about two hours since I still need a decent amount of sleep and realized I could probably put together all of the Christmas ornaments I had cross stitched and hang them on the tree this year!

I used little plastic gold frames for these ornaments. My mom bought me a whole bunch a few years ago and now it is time to use them. These frames didn't come with any backing in them so I used the cardboard on the back of a giant pad of paper I bought the kids from the Dollar Store as backing.

I used the frames as a guide to cut circles out of the cardboard and backing material.
Happy Little Circles
 I then used the cardboard as a guide to cut out the cross stitch material as well. Holding it up to a light helped to center the cross stitch.
Sometimes, I have a good ideas!
I used Elmer's Multi-PUrpose Spray Adhesive.

I used old Thomas the Train placemats as work surface. Be aware, though, that Elmer's Glue has a wide spray area; my 12 1/2" square ruler was just to the left of this placemat and it got covered in glue. 

No Glue
 Spray that circle!
Lots of Glue!
I stuck the backing material to the sticky side of the cardboard circle. As you can see, my cardboard circles and my fabric circles were somehow not the same size. I just cut the fabric to fit the circle.
How hard is it to cut circles?

I sprayed the opposite side of the circle and stuck the cross stitch onto it, trying very hard to make sure the design was as close to the middle of the circle as possible.

Yes, the Gingerbread Lady has no eyes. 
 Once I had both the cross stitch and the backing material on the circle I just kind of jammed it into the frame. I had to do a little finagling with scissors to get the thing to fit but they turned out fine.

Santa

Church

Bird

Candy Cane Heart


House

A few thoughts or, rather, learn from my mistakes.

1. After you cut out the cardboard circles, make sure that they fit into the frame. The first one I made, I used the inside of the frame to make my cardboard circle and after I had cut both the backing fabric and the cross stitch pattern I realized it was too small for the frame.
I wasn't feeling the joy when I realized I had done this! 

2. There's nothing saying you have to use the fabric on the back; I did because I thought it looked pretty. That being said, if I had to do it over again, I might have layered a piece of lightweight batting between the cardboard and the cross-stitch design in order to give it a little more....oomph. 

3. I've had these for so long but I'm pretty sure they are all JanLynn designs. 

That's it! I'm so happy to finish something that was on my List! What's even better is I have crossed off two more items (one by default but it still counts, right?). I'll be talking about the next one later in the week. 

So, what are you working on these days? Trying to get ready for the holidays? Anything you want to submit for December CraftBusters? Remember to get your submission into me by December 30 in order to win a $25 gift certificate to JoAnns (US Residents only, please). 

Have a Happy Week!

Kate


Wednesday, December 11, 2013

Log Cabin Ornaments


After I wrote my last post, I realized a few things:
1. I don't think any of the crafts I had written about were on my Master List. Oops!
2. I forgot about a couple of things I had made and BOTH of them I drew from the lottery. Happy Day!

The first one pulled was #44: Complete Christmas Ornaments to Hanging Quality.

So, once upon a time I was going to sell some of these ornaments I had made. No one wanted to buy them and I gave away the ones I had completed as little Christmas gifts to various people. I still had quite a few leftover that were unfinished. All they really needed was some backing, a ribbon and then I quilted them with a simple stitch-in-the-ditch and I finished them off in an afternoon. A few I have hanging on my tree and the rest I will give away at Christmas this year. At least they are done and out of my sewing hamper! Here's a pictorial history from finding them unfinished to hanging them on my tree.


The log cabin had already been sewed as well as the batting on the back
I had even cut the backing out for each of the squares. They measured 4"x4"

I added the ribbon


Then sewed right sides together. You can see here I left an opening for the ribbon (which I forgot on this ornament) and to pull it right side out. 


At this point I was ruing the fact I hadn't left a bigger opening as I pushed the fabric through the tiny hole.


The corner hadn't popped out very well....
...so I used my handy dandy chopstick to pop it out!

All better!

Then I pinned (maybe over-pinned) the rest of it shut and used a slip stitch to close it off by hand. 

Oops! Got a little carried away with the chopstick-you have to be careful. I fixed that with a slip stitch as well.


Finished on my tree!

I'll post the next item from the lottery I completed this Fall in a few days. It's pretty cute!

What kind of ornaments do you have on your tree?


Thursday, March 28, 2013

Advent during Lent? And failure

As I mentioned in one of my last posts, I was a little hesitant about picking the next project out of the lottery.

Luckily, I picked a project that I started maybe-oh I don't know-six or seven years ago, and it just needed to be finished. As I was looking at it I realized I was more than half way done and I had already done the most difficult part. I guess I get bored. Or distracted. Probably distracted. Actually, I get frustrated.

On to the project!

So, many years ago I started an Advent Calendar. I can't remember where I picked it up; I even called my mom to see if she was with me but she didn't know either. Somewhere in my wanderings this Advent Calendar and I met.


Basically what it is is a panel with a scene on it. You get to cut out the various people, animals, buildings, etc, glue some loops onto the different figurines, sew on some buttons, and then finish the panel however you see fit. I really like it because there are 25 figurines and you can hang a figurine each day in December. Kind of fun!


When I picked it up last week, I had already cut out all the figurines and had even used Lite Steam-A-Seam 2  (seriously people, this stuff is awesome!) to attach black felt to the back of each. This helps to stabilize them and they hang a lot nicer.

Next I cut out 25 2" pieces of black thread. The instructions said "crochet thread" but I have no idea what that is so I just used the thread (or floss) I would normally use when I do my counted cross stitch. Then I hot glued the thread on the back of each figurine, slightly burning my fingers in the process.

Did I take a picture of this part in the process? You betcha I didn't. It was late. It was dark. My fingers hurt. It wasn't happening.

The instructions said to use certain colored buttons to sew onto the panel. Part of my whole sewing philosophy (and this extends into various other parts in my life) is to use what I have. I wasn't going to go out and buy 14 aqua buttons and 11 some-other-colored buttons just for this project. I just scrounged around my sewing area and found 25 buttons that were about all the same size. I barely made it but I was happy to use up buttons that had just been sitting around with no purpose.

I sewed those bad boys on and it's pretty awesome because you sew them onto either little stars or red flowers, so you have the right placement.
I took that picture upside down on purpose


So, the figurines have been backed with felt and a loop attached, the buttons have been sewn on, let's finish this off nicely.

I cut out a piece of fabric for the back, cut out some batting, and made a nice little batting sandwich. Pinned all three pieces together like a pro-a pin every 4 inches-and started basting the edges. At this point it is after 10 PM (which is my bed time) and I wanted to get the basting done so I could make the binding the next day, attach it and be done. La-Te-Dah!


Did that happen? Not even a little. I start sewing one side, turn the corner, sew the bottom, turn the corner a second time, sew another side, turn a third corner to sew the top and finish sewing all three pieces of fabric together. About two inches from the end I realize that my bottom fabric is somehow two inches short.

I don't claim to be a sewing genius-in many ways I am self taught and still learning-but I did know enough to cut my bottom fabric bigger than my top fabric. So why is it two inches short? There might have been some mild cursing at this point in the game. I apologize. It was late. I was tired.

Again, did I take pictures of all this? No. And I do regret that I didn't because I do want to show my failures as much as my successes.

I went to bed. I didn't touch the thing for about 36 hours (hence the frustrated part). Finally, I did the smartest thing I could do: I called my mom who is a sewing genius-she's been sewing since she was in her teens! She made her own prom dress!

She told me that I didn't cut my bottom fabric big enough-it needs to be four inches bigger than the top fabric. I think I only did two.

Here is my second batting sandwich with the bottom fabric four inches bigger
Luckily I had more Christmas fabric hiding out in my stash and I was able to layer all three pieces of fabric together with no problems. Made my binding and attached it. I hung all the figures on the buttons and showed my husband. He liked it and then asked how I was going to display it.
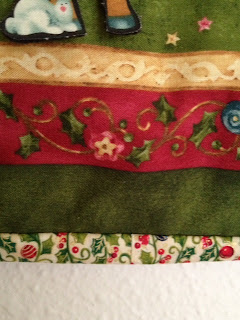
Look at that beautiful binding!
 Machine stitched on one side, hand stitched on the other
Oops! Forgot to add the loops to the back.

Hand sewed those on during the kids' nap and then I was done!

I like it. It's cute.

But it's time to get honest.

I'm not really sure why I bought it in the first place-was I on a sewing high?- because I already have an Advent Calendar that I love. So I am not too sure what I am going to do with it. The kids will like it because they can attach all the figures--which makes me think that it would also be cool to do this with velcro instead of buttons. Maybe easier? Not that sewing buttons is difficult. But just a thought.

I won't worry about what to do with it until Advent.


By then I might have a plan for it!

If you would like to have this in your home, I did a quick Google search and found a couple of different places for you to buy it.

You can buy it here on Etsy already completed.

You can buy the panel here and do it yourself.

But shop around online and see what works best for you!